Using just 2 Halloween-themed keys, you can make truly terrifying (and terrific!) mini works of art. Get great ideas for your own creepy creations in this video.
YouTube link: http://youtu.be/IKbHkt-cdAw

Everything paper, featuring Close To My Heart products, including our exclusive Cricut Collections, craft organizers, pattern books, and much more!
Monday, October 28, 2013
Artbooking Made Easy - Episode 5
********* Video is posted above *********
Posted by Jeanette Lynton


Z1771 Green Glitz™ Glitter Gel
Z1847 Green Glitter Paper
Z1829 Black & Grey Glitter Paper
Z1754 Black & Grey Sparkles
Z1817 Slate Polka-Dot Washi Tape
Z1799 Silver Shimmer Trim
Z1864 Slate Striped Twist Ties
Z1802 Slate Satin Polka-Dot Ribbon
Z1882 Base & Bling Word Accents
Z1806 Green & Blue Epoxy Bubbles
Colors: Slate, Goldrush, Smokey Plum, Crème Brulee, Sweet Leaf, black
X7171B Sarita Paper Packet
X7173B Babycakes Paper Packet
Z1854 Laughing Lola Assortment
Z1771 Green Glitz™ Glitter Gel
Z1847 Green Glitter Paper
Z1829 Black & Grey Glitter Paper
Z1754 Black & Grey Sparkles
Z1817 Slate Polka-Dot Washi Tape
Z1799 Silver Shimmer Trim
Z1864 Slate Striped Twist Ties
Z1862 Black Mini-Medly Accents Collection
Z1781 Black Striped Grosgrain Ribbon
Colors: White Daisy, Gypsy, Goldrush, Pear, Slate, Honey, Sunset, black


Posted by Jeanette Lynton
I hope
you’re ready for more eerie education on the Artbooking cartridge, because this
time I want to talk about making simply spooky mini albums. Don’t let this
feature of the Artbooking cartridge scare you—there are so many tasty treats in
store for you once you’ve learned a few tricks. Let’s start with a few from
this video:
The
Halloween-themed mini album keys, found on pages 54 and 55 of the booklet, are
full of wonderful shapes, pages, and embellishments. Something I love about
mini albums is that they give lots of opportunity for getting artistic! The
pages themselves are shapes, and embellishing them is a lot of fun when you’re
a “detail person” like I am. Let’s look at some of the tasteful tricks of these
albums together.
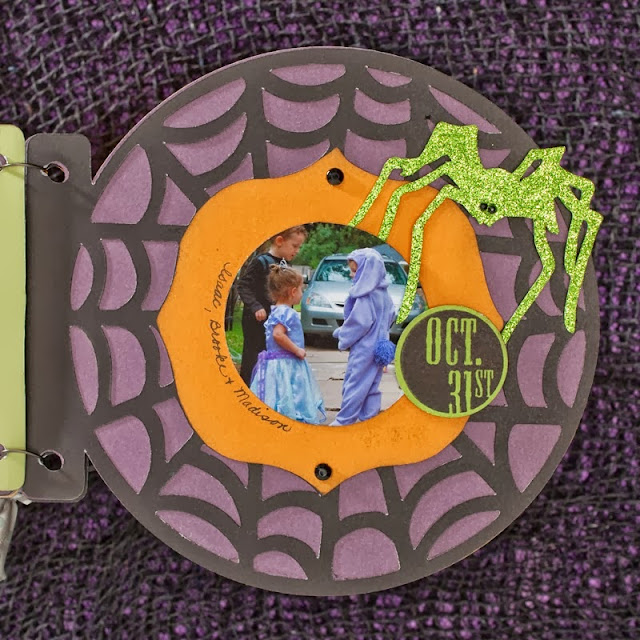
Did
you notice the fun use of a little glitz on many of these pages? The eyes of
the bats, cats, and spiders are all done with green Glitz™ glitter gel, which
coordinates perfectly with the shapes cut from green glitter paper. I
especially love the way the glitter gel has been speckled across this haunted
house, giving the feel of an eerie something lurking inside.


Getting
a little crazy with your colors is very fitting for a Halloween project. You’ll
notice that where some elements would normally be cut in black, they’ve been
cut in a color that makes them pop. This spider web, for instance, as well as
this spider.
There
are several techniques you can try that will add a whole lot to these pages:
stitching, sanding, inking wooden shapes to give them darker color, and using
markers to color in stamped images are amongst my favorites. Don’t forget that
inking the edges of several shapes, like the moon and ghost shapes, will add a
shadow effect very appropriate for this theme.
Once
you have the pages of your mini album cut at a linked size, play with real dial
size to get some unique shapes. These rat shapes are overlays, as listed in the
booklet, but with real dial size set at 1" or 1 1/2", you can make
these mini shapes as embellishments and pop them up with 3-D foam tape.

The
time you save cutting the shapes for your mini albums with the Artbooking
cartridge can be used to embellish its pages as creatively as you desire. Have
a whole lot of fun bringing to life your own creation this Halloween season!


Recipes:
6"
Neighborhood Halloween Party Mini Album
Z1906
Cricut© Artbooking CartridgeZ1771 Green Glitz™ Glitter Gel
Z1847 Green Glitter Paper
Z1829 Black & Grey Glitter Paper
Z1754 Black & Grey Sparkles
Z1817 Slate Polka-Dot Washi Tape
Z1799 Silver Shimmer Trim
Z1864 Slate Striped Twist Ties
Z1802 Slate Satin Polka-Dot Ribbon
Z1882 Base & Bling Word Accents
Z1806 Green & Blue Epoxy Bubbles
Colors: Slate, Goldrush, Smokey Plum, Crème Brulee, Sweet Leaf, black
6"
Happy Halloween Mini Album
Z1906
Cricut© Artbooking CartridgeX7171B Sarita Paper Packet
X7173B Babycakes Paper Packet
Z1854 Laughing Lola Assortment
Z1771 Green Glitz™ Glitter Gel
Z1847 Green Glitter Paper
Z1829 Black & Grey Glitter Paper
Z1754 Black & Grey Sparkles
Z1817 Slate Polka-Dot Washi Tape
Z1799 Silver Shimmer Trim
Z1864 Slate Striped Twist Ties
Z1862 Black Mini-Medly Accents Collection
Z1781 Black Striped Grosgrain Ribbon
Colors: White Daisy, Gypsy, Goldrush, Pear, Slate, Honey, Sunset, black
**** Extra pics of mini albums created by the CTMH Art Department ****


(thanks Noreen for the extra pics :)
**** Tips for re-creating the artwork from the video ****
Halloween
Mini-Albums from Artbooking page 54-55
All shapes have been
cut at 6" to proportionally fit together
Happy Halloween mini
album:
Snip welded titles
(like "Halloween") to bend along a circle
Use real dial size
to create a smaller page to allow room for overhanging embellishments
Haunted House mini
album:
Use haunted house as
cover for this book
Cut page twice in
Smokey Plum & Slate and once in Goldrush
Use cut elements
from both to create different parts of house with Goldrush sandwiched in the
middle
Use Real Dial Size
key to 'shrink down' elements designed for 12x12 layouts such as the castle
Snip out the bracket
frame from inside the spiderweb page and layer for an extra accent
To make a shadow on
the jack o'lantern face, offset black behind the Goldrush, then trim off the
overhanging excess
Princess Layout:
Use elements from
Halloween keys to create a completely different look
This haunted house
is used to create a princess castle
Sunday, October 27, 2013
Artbooking Made Easy (S01E04): Spooky Halloween Layouts
It’s easy to make your spider webs stand out, full moons float, and black cats bounce off the page with the Cricut® Artbooking collection. Learn a few sweet techniques for using the Halloween-themed keys in this video.
YouTube video link: http://youtu.be/kKNk4vRD0_4
YouTube video link: http://youtu.be/kKNk4vRD0_4
Artbooking Made Easy - Episode 4
********** Video is posted at the end of today's blog **********
Posted by Jeanette Lynton...

 The
cute cat used on this layout, stamped and cut with instructions from the Eek
& Shriek stamp set, has hauntingly hollow eyes made from green Glitz™
glitter gel. Don’t you love him? He’s got friends from the same stamp set,
along with 3 other sets found in the latest Idea Book, that can be used to
complement the Halloween cuts from this cartridge. Do you recall the moon &
bat combo cut from the video? Can you see it being complemented nicely with
this stamp (yet another from the Eek & Shriek set), which pictures a
similar moon/bat combination? I can. Experiment with the two and see what eerie
creations you can concoct.
The
cute cat used on this layout, stamped and cut with instructions from the Eek
& Shriek stamp set, has hauntingly hollow eyes made from green Glitz™
glitter gel. Don’t you love him? He’s got friends from the same stamp set,
along with 3 other sets found in the latest Idea Book, that can be used to
complement the Halloween cuts from this cartridge. Do you recall the moon &
bat combo cut from the video? Can you see it being complemented nicely with
this stamp (yet another from the Eek & Shriek set), which pictures a
similar moon/bat combination? I can. Experiment with the two and see what eerie
creations you can concoct.


 Recipes:
12" x 12" Halloween Layout
Z1906 Cricut® Artbooking Collection
B1429 Eek & Shriek
X7170B Laughing Lola Paper Packet
Z1847 Green Glitter Paper
Z1754 Sparkles Black & Grey Assortment
Z1806 Green & Blue Epoxy Bubbles
Colors: Laughing Lola Purple, Honey, Slate, Black
C1522 Creepy Creatures
B1413 Perfect Fit–Halloween
X7171B Sarita Paper Packet
Z1829 Black & Grey Glitter Paper
Z1847 Green Glitter Paper
Z1850 Lagoon Houndstooth Washi Tape
Z1853 Aqua Dots
Colors: Slate, Whisper, Goldrush, Lagoon, Pear, White Daisy, Black


Posted by Jeanette Lynton...
Autumn
is here, and with the new chill in the air my thoughts turn to the approaching
fun of the Halloween season. It’s always been a whole lot more heartwarming
than haunting at my home—snapping photos of my kids, so proud in their homemade
costumes, was always very exciting to me. I never could tell which of us was
having more fun—the kids or me!
The
tricks and treats that abound at Halloween are thrilling to experience, and
just as fun to capture in layouts. Today I am oozing with ideas on how to use
the Cricut® Artbooking cartridge to make your own, and, starting with the
video, I’m going to share some with you.
Aren’t
these layouts “wicked” fun? To add to your bubbling brew of ideas, I’ll share a
few more ideas from the layouts you just saw in the video.
If you
take a peek at the cartridge booklet you’ll find, on pages 70 and 71, the
Halloween-themed keys you just saw. But there are more kooky cuts than you saw
on the layouts from the video! Notice the image pictured in the left-hand
corner of page 70 that suggests layering the skull & bones photo mat atop
the web overlay.
I love
this look! Just as Kristine showed us in the video with the black photo mat
layered with black glitter paper webs, you can trim elements from any cut to
fit your tastes. If you trim the middle of the web to make room for the photo
mat, you’ll have another web to use elsewhere on your Halloween layout, and in
a unique shape.

 The
cute cat used on this layout, stamped and cut with instructions from the Eek
& Shriek stamp set, has hauntingly hollow eyes made from green Glitz™
glitter gel. Don’t you love him? He’s got friends from the same stamp set,
along with 3 other sets found in the latest Idea Book, that can be used to
complement the Halloween cuts from this cartridge. Do you recall the moon &
bat combo cut from the video? Can you see it being complemented nicely with
this stamp (yet another from the Eek & Shriek set), which pictures a
similar moon/bat combination? I can. Experiment with the two and see what eerie
creations you can concoct.
The
cute cat used on this layout, stamped and cut with instructions from the Eek
& Shriek stamp set, has hauntingly hollow eyes made from green Glitz™
glitter gel. Don’t you love him? He’s got friends from the same stamp set,
along with 3 other sets found in the latest Idea Book, that can be used to
complement the Halloween cuts from this cartridge. Do you recall the moon &
bat combo cut from the video? Can you see it being complemented nicely with
this stamp (yet another from the Eek & Shriek set), which pictures a
similar moon/bat combination? I can. Experiment with the two and see what eerie
creations you can concoct.
Though
most of the items you saw in the video were linked at 11", remember that
you aren’t limited to using only images cut at that linked size. Use the “real
dial size” button to spice up your layouts. For example, by cutting this spooky
fence shape at a large size and layering it on top of a smaller-sized haunted
house shape, you will give the impression that the house sits far off in the
background. The house will loom in the back instead of being a focus of the
layout, and that means your adorable costume-laden photos can take precedence.


I hope
you have some fun brewing your own Halloween layout recipes. The Artbooking
cartridge will add some flavor, but the magic is all in you!

12" x 12" Halloween Layout
Z1906 Cricut® Artbooking Collection
B1429 Eek & Shriek
X7170B Laughing Lola Paper Packet
Z1847 Green Glitter Paper
Z1754 Sparkles Black & Grey Assortment
Z1806 Green & Blue Epoxy Bubbles
Colors: Laughing Lola Purple, Honey, Slate, Black
12"
x 12" Boo Layout
Z1906
Cricut® Artbooking CollectionC1522 Creepy Creatures
B1413 Perfect Fit–Halloween
X7171B Sarita Paper Packet
Z1829 Black & Grey Glitter Paper
Z1847 Green Glitter Paper
Z1850 Lagoon Houndstooth Washi Tape
Z1853 Aqua Dots
Colors: Slate, Whisper, Goldrush, Lagoon, Pear, White Daisy, Black
Pasted
from <http://www.jeanettelynton.com
***** Additional pics of artwork created by the CTMH art department *****


(thanks Noreen for the extra pics :)
Saturday, October 26, 2013
Artbooking Made Easy - Episode 3
******** The video is posted at the end of today's blog ********
Posted by Jeanette Lynton:


 This
album was bound with jump rings wrapped in hemp baker’s twine from the
Mini-Medley Accents wooden collection, and topped with bows of burlap ribbon.
Isn’t it a great match for the album itself? Use a variety of accents, like
washi tape or twist ties, to beautify your own binding.
This
album was bound with jump rings wrapped in hemp baker’s twine from the
Mini-Medley Accents wooden collection, and topped with bows of burlap ribbon.
Isn’t it a great match for the album itself? Use a variety of accents, like
washi tape or twist ties, to beautify your own binding.

D1546 Frame Flair
Z1911 Designed Décor Frame Kit Stamp Set
C1561 One-Way Borders
X7168B Surf’s Up Paper Packet
X7173B Babycakes Paper Packet
Z1841 Surf’s Up Assortment
Z1873 Sarita Assortment
Z1869 Babycakes Assortment
Z1789 Chalkboard Sheet
Z1844 Color-Ready Trinkets Wooden Shapes
Z1760 Burlap Ribbon
Z1806 Green & Blue Epoxy Bubbles
Z1863 Color-Ready Midtown Cork Shapes
Z1864 Slate Striped Twist Ties
Z1837 Mini-Medly Accents Wooden Collection
Z1815 Mini Clothes Pins
Colors: Crystal Blue, Colonial White, Buttercup, Sorbet
C1534 Sightseer
X7168B Surf’s Up Paper Packet
X7167B Later Sk8r Paper Packet
X7163B Chantilly Paper Packet
X7169B Tommy Paper Packet
Z1752 Sparkles Clear Assortment
Z1808 Outdoor Denim Chevron Ribbon
Z1844 Color-Ready Trinkets Wooden shapes
Z1799 Silver Shimmer Trim


About mini albums in Artbooking:
Posted by Jeanette Lynton:
The
Cricut© Artbooking cartridge has added a whole new dimension to my crafting
with its capability to create mini albums, and I know it will do the same for
you. Never heard of a mini album? Let me explain! These smaller-scale books,
also called art books or mini books, are a great way to show off your photos in
a smaller format than a 12" x 12" album, and they are so much fun to
make. I love to flip through their small, decorated pages to see journaling,
embellishments, and a lot of smiles. And I love that they are so easy to hold
in my hands, easy to navigate, and that I get to use great scrapbooking
products and shapes from my Cricut© to decorate them! They are a great way to
capture memories from venues of all kinds, but I love to take photos from a
single event and pick just the right theme for them from my Artbooking
cartridge.
I have
a feeling that the artist who created these albums had just as much fun making
the art as the people in the photos had making the memories. The Artbooking
cartridge is a lot of fun to use, and full of new shapes for your crafting.
Take a
closer look at these cute albums from the video. The summer-themed keys that
feature all of these sunny shapes can be found on pages 52 and 53 of your
Cricut® booklet. Pay attention to the size listed for individual keys to keep
your pages the same proportions as you see in the booklet.

One of
my favorite features about the mini album feature of the cartridge is its
capability to make pages into unique shapes. I love the pennant shape here,
which serves as the base page. You can find this shape on page 53 of your
booklet, complete with holes already punched for simple binding. This page was
cut at 7", as were all the pages in this book, and the included photo is
3" x 2 1/2". But it’s more versatile than it seems at first glance.

The
same shape was cut at 4" real dial size for another album, shown here,
where it serves as a simple background shape. Same pennant shape, cleverly
disguised in Lagoon cardstock and tucked behind a journaling spot! Many
of the shapes you see on this cartridge can be used for purposes other than
what is listed in the booklet. Exercise your creativity and make them work in
new ways!
You
heard in the video the suggestion to get creative with how you bind your mini
albums, and I agree wholeheartedly. There are so many fun ways to do it.

Start
crafting your own ideas, and I know you’ll have yourself a matchless mini album
in no time. I am so excited to see what page-turning adventures are ahead for
you and your own Cricut© Artbooking cartridge!

Recipes:
7"
Fun & Sun Mini Album
Z1906
Cricut® Artbooking CollectionD1546 Frame Flair
Z1911 Designed Décor Frame Kit Stamp Set
C1561 One-Way Borders
X7168B Surf’s Up Paper Packet
X7173B Babycakes Paper Packet
Z1841 Surf’s Up Assortment
Z1873 Sarita Assortment
Z1869 Babycakes Assortment
Z1789 Chalkboard Sheet
Z1844 Color-Ready Trinkets Wooden Shapes
Z1760 Burlap Ribbon
Z1806 Green & Blue Epoxy Bubbles
Z1863 Color-Ready Midtown Cork Shapes
Z1864 Slate Striped Twist Ties
Z1837 Mini-Medly Accents Wooden Collection
Z1815 Mini Clothes Pins
Colors: Crystal Blue, Colonial White, Buttercup, Sorbet
7"
Fun & Sun 2012 Mini Album
Z1906
Cricut® Artbooking CollectionC1534 Sightseer
X7168B Surf’s Up Paper Packet
X7167B Later Sk8r Paper Packet
X7163B Chantilly Paper Packet
X7169B Tommy Paper Packet
Z1752 Sparkles Clear Assortment
Z1808 Outdoor Denim Chevron Ribbon
Z1844 Color-Ready Trinkets Wooden shapes
Z1799 Silver Shimmer Trim
**** Additional pics of the mini albums created by the CTMH art department ****

(thanks Noreen for the extra pics :)
****** Tips for re-creating the video artwork *******About mini albums in Artbooking:
- The indicated size in the booklet is the minimum size of the finished album
- All of the paper shapes in this mini album are cut proportional to a 7" finished album even though they aren't all actually 7" in height.
- The pages were designed to be cut at different heights & widths to give it an organic "homemade" look.
Artbooking Made Easy (S01E03): Summer Mini-Albums
From grilling to swimming, camping, and road-tripping, your summer has been full of adventures. Show them off with the help of the new Cricut® Artbooking collection! You can make unique and fun mini-albums with the touch of just two summer-themed keys.
YouTube video link: http://youtu.be/VM9up7lFovk
YouTube video link: http://youtu.be/VM9up7lFovk
Friday, October 25, 2013
Artbooking Made Easy - Episode 2
************** Video is at the end of this post ****************
I love
the versatility of our school-themed overlays and photo mats (you’ll find them,
and all other scholarly keys, on pages 68 and 69 in the Cricut® booklet). You
can do so many creative things with the individual boxes! Take, for instance,
the days of the week calendar overlay.
 With
the linked dial size at 11", you can cut all pieces on this project at the
proportions seen here. The photos of this adorable little guy ready for his
first day of school are 4" x 6" and 5" x 7". Don’t you love
the way the artist who made this layout chose to attach one behind the photo
frame, and place the other on top, with a little foam tape for added pop?
Another great stylistic choice the artist made was choosing to list school
subjects in the empty slots originally meant for the days of the week. It would
be just as fun to list names of teachers, after-school clubs, or cherished
classmates! Another idea: try cutting away the days of the week to leave seven
empty slots that can be used to focus on academic goals, favorite recess
activities, or class pets.
With
the linked dial size at 11", you can cut all pieces on this project at the
proportions seen here. The photos of this adorable little guy ready for his
first day of school are 4" x 6" and 5" x 7". Don’t you love
the way the artist who made this layout chose to attach one behind the photo
frame, and place the other on top, with a little foam tape for added pop?
Another great stylistic choice the artist made was choosing to list school
subjects in the empty slots originally meant for the days of the week. It would
be just as fun to list names of teachers, after-school clubs, or cherished
classmates! Another idea: try cutting away the days of the week to leave seven
empty slots that can be used to focus on academic goals, favorite recess
activities, or class pets.
 You’ll
notice that the ruler shape shows up in many places on these layouts, but never
in the same way twice. Just by backing it with different colors, angling it in
various ways on the page, and even detaching it from its original photo mat,
this page’s artist made a very versatile element. What you see here is a ruler
cut at the 11" linked dial size, the colors Crystal Blue, Ruby, Whisper,
Goldrush, Pear, and Lagoon. How will you take the images you see here and tweak
them to fit your tastes? I’m sure you already have ideas spinning . . . and
that’s exactly what I hope for!
You’ll
notice that the ruler shape shows up in many places on these layouts, but never
in the same way twice. Just by backing it with different colors, angling it in
various ways on the page, and even detaching it from its original photo mat,
this page’s artist made a very versatile element. What you see here is a ruler
cut at the 11" linked dial size, the colors Crystal Blue, Ruby, Whisper,
Goldrush, Pear, and Lagoon. How will you take the images you see here and tweak
them to fit your tastes? I’m sure you already have ideas spinning . . . and
that’s exactly what I hope for!
 This
layout was also made with the linked dial size set at 11". The right page
features an overlay of nine boxes, used here to picture 3" x 3"
photos of four adorable girls. Filling the squares with faces of grade school
friends would be just as easy, and a fun keepsake for a child to cherish in
later years.
This
layout was also made with the linked dial size set at 11". The right page
features an overlay of nine boxes, used here to picture 3" x 3"
photos of four adorable girls. Filling the squares with faces of grade school
friends would be just as easy, and a fun keepsake for a child to cherish in
later years.
There are so many creative things you can do with all of the keys of the Cricut® Artbooking cartridge, and the school-themed keys are top-of-the-class.
Now that you’ve seen it in action in our jeanettelynton.com classroom, you can return to your crafting space and do your homework—if you can call something you love this much “work”. Class dismissed!

Recipes:
12" x 12" Hello Mr. Smarty Layout
Z1906 Cricut® Artbooking Collection (cuts and stamp set)
X7172B ProPlayer Paper Packet
Z1701 Baker’s Twine Neutral Assortment
Z1848 Red Shimmer Trim
Colors: Crystal Blue, Ruby, Whisper, Goldrush, Pear, Lagoon, Colonial White
D1556 My Acrylix® School Years
X7171B Sarita Paper Packet
Z1869 Babycakes Assortment
Z1850 Lagoon Houndstooth Washi Tape
Colors: Olive, Cocoa, Honey, Juniper, Whisper, kraft
********* Additional pics from the CTMH Art Department **********


Posted by Jeanette Lynton
Attention,
class! As you saw in our opening video, today’s lesson is on how incredibly
easy it is to use the school-themed keys of the Cricut® Artbooking cartridge to
make great projects. Recall
that there are two image-packed keys for every single theme on this cartridge.
They’re designed so you can cut several elements for a page without the
guesswork—which is simply thrilling!—but that doesn’t mean you should feel
stuck using only the cuts from that key on a single layout. You’ll have the
most fun when you mix the two! Pages made of images from both keys will be
especially unique, and with some creative stamping your projects will
undoubtedly be all your own. Let’s
take a closer look at the A+ layouts you just saw in the video.
 With
the linked dial size at 11", you can cut all pieces on this project at the
proportions seen here. The photos of this adorable little guy ready for his
first day of school are 4" x 6" and 5" x 7". Don’t you love
the way the artist who made this layout chose to attach one behind the photo
frame, and place the other on top, with a little foam tape for added pop?
Another great stylistic choice the artist made was choosing to list school
subjects in the empty slots originally meant for the days of the week. It would
be just as fun to list names of teachers, after-school clubs, or cherished
classmates! Another idea: try cutting away the days of the week to leave seven
empty slots that can be used to focus on academic goals, favorite recess
activities, or class pets.
With
the linked dial size at 11", you can cut all pieces on this project at the
proportions seen here. The photos of this adorable little guy ready for his
first day of school are 4" x 6" and 5" x 7". Don’t you love
the way the artist who made this layout chose to attach one behind the photo
frame, and place the other on top, with a little foam tape for added pop?
Another great stylistic choice the artist made was choosing to list school
subjects in the empty slots originally meant for the days of the week. It would
be just as fun to list names of teachers, after-school clubs, or cherished
classmates! Another idea: try cutting away the days of the week to leave seven
empty slots that can be used to focus on academic goals, favorite recess
activities, or class pets.

There are so many creative things you can do with all of the keys of the Cricut® Artbooking cartridge, and the school-themed keys are top-of-the-class.
Now that you’ve seen it in action in our jeanettelynton.com classroom, you can return to your crafting space and do your homework—if you can call something you love this much “work”. Class dismissed!

Recipes:
12" x 12" Hello Mr. Smarty Layout
Z1906 Cricut® Artbooking Collection (cuts and stamp set)
X7172B ProPlayer Paper Packet
Z1701 Baker’s Twine Neutral Assortment
Z1848 Red Shimmer Trim
Colors: Crystal Blue, Ruby, Whisper, Goldrush, Pear, Lagoon, Colonial White
12"
x 12" Think, Grow, Learn Layout
Z1906
Cricut® Artbooking CollectionD1556 My Acrylix® School Years
X7171B Sarita Paper Packet
Z1869 Babycakes Assortment
Z1850 Lagoon Houndstooth Washi Tape
Colors: Olive, Cocoa, Honey, Juniper, Whisper, kraft
Pasted
from http://www.jeanettelynton.com/
********* Additional pics from the CTMH Art Department **********


(thanks Noreen for the extra pics :)
************* Extra tips for re-creating this layouts ****************
Hello Mr. Smarty:
- Combines element from both page 68 & 69, all cut at 11"
- When combining elements from non-related keys, it may be necessary to use Real Dial Size for desired size
- The sunburst with "This Week" is from set included with cartridge and cut at 1 3/4" as printed on carrier sheet
- Words in black are cut from font on the Artbooking cartridge
Ready Set Go layout:
- Artbooking page 69 (letter X), School Layout
- All Cricut elements are cut a 11" to keep proportional sizing
- Additional stamped elements from "School Years" set cut according to size printed on carrier sheet
- Uses the 9-square overlay
- Cover up parts of an overlay to change size/background color
- Use the open spaces for journaling, photos, stamped embellishments, etc.
First Day layout:
- All cut from elements on page 68 at 11"
- Cut title twice using brown or black for second and offset it under title for shadow effect
- Small letters from Keyboard Kraft Alphabet stickers, Z1825
- Grid overlay on 2nd page is actually the month calendar turned upside down
Artboooking Made Easy (S01E02): A+ School Layouts
Get educated on making fun back-to-school layouts and mini books with the Cricut® Artbooking cartridge. Mixing and matching shapes from both school-themed keys will send your projects to the top of the class!
YouTube link: http://youtu.be/Ezs0bBOPiFs
YouTube link: http://youtu.be/Ezs0bBOPiFs
Thursday, October 24, 2013
Introduction to Artbooking - CTMH's newest exclusive Cricut cartridge
Greetings all,
I'm playing catch up after playing for two months in Canada and Alaska....yes, it was amazing...but that's another blog on another day :)
I will be posting this week some CTMH produced pictures, articles, and videos describing the new Artbooking cartridge. I've consolidated these sources with help from my sister consultants and my CTMH website to provide my readers with samples until I'm able to create my own artwork. Enjoy....
********* The video Jeanette is referring to is at bottom of post *******

Ladies and gentlemen, it is my honor to introduce a series of posts about a new Close To My Heart product that has me elated! There’s so much goodness packed into one product that it’ll take me months to share what it has to offer—but that’s perfectly OK with me, because I know you’ll be falling in love as much as I have . . . if you haven’t already.
You’ve noticed that your Cricut® can do some amazing things, but when cutting multiple shapes for the same project you’ve also noticed that they aren’t always so easy to make proportionate—to each other, or to the page itself. The real dial size setting is wonderful, but adjusting it for each cut takes time. I have considered this dilemma over and over again, and have been on the hunt for a good solution. I haven’t found the solution anywhere, but I have created one!
That’s one of the reasons I love the Cricut® Artbooking cartridge! It is absolutely overflowing with images (700, to be exact) and they’re grouped into 15 fun themes for layouts, with 10 for mini books. Of course, the best part is that the images are specially “linked” together to solve the proportion problem. This cartridge is revolutionary! I want to share with you a first glimpse of what you can do with it:
Isn’t it amazing? Take a look at some of the elements of these projects up-close.

 Notice
the similarities in the photo mats on this page. Both come from the same key,
and complement one another nicely. They can be mixed and matched with others,
of course, but they are a great set.
Notice
the similarities in the photo mats on this page. Both come from the same key,
and complement one another nicely. They can be mixed and matched with others,
of course, but they are a great set.

 The
photo mats on this page are also noteworthy. The same design, but with a
different orientation, can be found on the same key on this cartridge, and that
makes selecting a mat for various-sized photos easy.
The
photo mats on this page are also noteworthy. The same design, but with a
different orientation, can be found on the same key on this cartridge, and that
makes selecting a mat for various-sized photos easy. The mini album
project is one of my favorites! The fun shapes of the pages give it such a
quirky flair. This photo is short in height, but long in width. This page was
cut to fit it just right, don’t you think?
The mini album
project is one of my favorites! The fun shapes of the pages give it such a
quirky flair. This photo is short in height, but long in width. This page was
cut to fit it just right, don’t you think?
I hope you enjoyed your first glimpse into the cartridge! We’ll spend a lot of time over the next several months picking out the details and enjoying them together. I’m overjoyed at the thought of what imaginative creations you will come up with as you discover for yourself its almost endless options, and hope you’ll share your own Artbooking adventures along the way.
Pasted from http://www.jeanettelynton.com
2 of a Kind layout
BFF layout
Family Reel Life mini album
I'm playing catch up after playing for two months in Canada and Alaska....yes, it was amazing...but that's another blog on another day :)
I will be posting this week some CTMH produced pictures, articles, and videos describing the new Artbooking cartridge. I've consolidated these sources with help from my sister consultants and my CTMH website to provide my readers with samples until I'm able to create my own artwork. Enjoy....
********* The video Jeanette is referring to is at bottom of post *******

Ladies and gentlemen, it is my honor to introduce a series of posts about a new Close To My Heart product that has me elated! There’s so much goodness packed into one product that it’ll take me months to share what it has to offer—but that’s perfectly OK with me, because I know you’ll be falling in love as much as I have . . . if you haven’t already.
You’ve noticed that your Cricut® can do some amazing things, but when cutting multiple shapes for the same project you’ve also noticed that they aren’t always so easy to make proportionate—to each other, or to the page itself. The real dial size setting is wonderful, but adjusting it for each cut takes time. I have considered this dilemma over and over again, and have been on the hunt for a good solution. I haven’t found the solution anywhere, but I have created one!
That’s one of the reasons I love the Cricut® Artbooking cartridge! It is absolutely overflowing with images (700, to be exact) and they’re grouped into 15 fun themes for layouts, with 10 for mini books. Of course, the best part is that the images are specially “linked” together to solve the proportion problem. This cartridge is revolutionary! I want to share with you a first glimpse of what you can do with it:
Isn’t it amazing? Take a look at some of the elements of these projects up-close.

 Notice
the similarities in the photo mats on this page. Both come from the same key,
and complement one another nicely. They can be mixed and matched with others,
of course, but they are a great set.
Notice
the similarities in the photo mats on this page. Both come from the same key,
and complement one another nicely. They can be mixed and matched with others,
of course, but they are a great set. 
 The
photo mats on this page are also noteworthy. The same design, but with a
different orientation, can be found on the same key on this cartridge, and that
makes selecting a mat for various-sized photos easy.
The
photo mats on this page are also noteworthy. The same design, but with a
different orientation, can be found on the same key on this cartridge, and that
makes selecting a mat for various-sized photos easy. The mini album
project is one of my favorites! The fun shapes of the pages give it such a
quirky flair. This photo is short in height, but long in width. This page was
cut to fit it just right, don’t you think?
The mini album
project is one of my favorites! The fun shapes of the pages give it such a
quirky flair. This photo is short in height, but long in width. This page was
cut to fit it just right, don’t you think?I hope you enjoyed your first glimpse into the cartridge! We’ll spend a lot of time over the next several months picking out the details and enjoying them together. I’m overjoyed at the thought of what imaginative creations you will come up with as you discover for yourself its almost endless options, and hope you’ll share your own Artbooking adventures along the way.
Pasted from http://www.jeanettelynton.com
*******Tips for re-creating the artwork in episode 1********
Introduction to
Artbooking themes
- 15 layout themes
- 10 mini book themes
- Includes seasons & holiday themes...Autumn, Halloween, Valentine's Day, Christmas & more
- But it's just not for holidays! Use it year-round with themes like friends, travel, sports, baby, etc.
2 of a Kind layout
- Cricut elements from page 78 - Friendship Layout
- All layout element are cut at size of 11" to stay in proportion
- Built in title: 2 of a Kind
- Title isn't 11" tall, but it is proportional to layout. You don't have to move the size dial at all.
- Stamped elements from included Artbooking set cut at Real Dial Size
BFF layout
- Cricut elements from page 79 - Friendship Layout
- Built in title: BFF
- Circle around the F for "Friday" - intended to spotlight day of week in photo mat
- Overlays with straight gutters may be cut apart to change size or use as embellishment
Family Reel Life mini album
- Cricut elements from 8x8 Inspiration mini album on pages 44-45
- Collection includes base pages, titles, overlays, photo mats, pocket, borders, and embellishments
- All cut at 8" to stay in proportion to each other
- Save negative pieces from overlays to use separately
- Fold flags in half to tuck behind photos
- Stamped elements from various stamp sets
Artbooking Made Easy (S01E01): Getting Started with Cricut Artbooking
Welcome to Artbooking Made Easy! In this 8-month series, we will show you how to use the brand-new, revolutionary Close To My Heart Cricut® Artbooking collection to create works of art! From mini scrapbooks to layouts, you’ll find themes to fit any occasion—just set one dial size and let Artbooking do the rest! Join us each week for the Artbooking Made Easy series from September 2013 through April 2014.
Subscribe to:
Posts (Atom)